Black and white Halloween postcard
collage on 4" x 6" cardboard.
Start by cutting scrap cardboard to 4" x 6".
Tear old book pages into strips.
Glue strips of text to the printed side of the cardboard.
I used Aileene's Tacky Glue, staggering the pages for
extra interest.
Trim around the edge of the postcard with scissors.
Paint over the text with gesso. You can wipe off some
of the gesso with a paper napkin so more of the text
shows through.
Use some paper scraps for the collage in colors that
you would like to use. I was going for a black and white
theme, so I used a limited palette. Scrapbook papers,
painted papers, (as below) the inside of security envelopes,
and Dover clip art are all good choices for
black and white designs.
The leaf on the right was from a Dover clip art book,
but you could draw or stamp one too.
I used a hair dryer to quickly dry the gesso. I begin laying
out collage elements and moving them around to make
a pleasing arrangement.
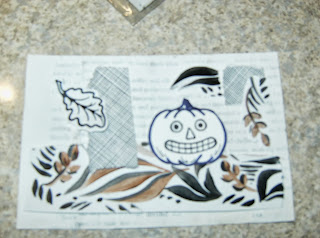
I drew the vintage-style pumpkin myself. These features
are pretty easy to imitate...
Notice the square of security envelope got moved up
to the top right corner, and more pieces of the painted
paper were added to it. It is usually a good idea to
repeat some motifs or shapes within the composition.
The leaf on the diagonal top left serves to lead your eye
into the composition.
Detail of the vintage style pumpkin, above.
"Jolly Halloween" was hand-written onto black
card stock in white gel pen. You could certainly
stamp letters on strips of white paper and glue to
black card stock, or even print them from
your computer. To finish, I usually add some
pen work. Here I've added pen strokes behind
the pumpkin and behind the leaf. I also added
an outline with a few curlicues around the
outside edge of the card.
I hope you enjoyed this tutorial with your
tea (or beverage of choice) today. Visit
Bluebeard and Elizabeth at
Altered Book Lover, for Tuesday 'T.'
Stop by again soon for more
Halloween inspired fun!


I love seeing how your collages come together. This black and white postcard is gorgeous and perfect. Of course, I always get a laugh when I see "murder of crows."
ReplyDeleteThanks for your T tutorial today. It seems appropriate, since it's already October.
Your postcard made me smile! Thanks for sharing your process which I soaked up like a sponge since I am fairly new to the paper world!
ReplyDeleteThanks for the tutorial and the reminder that I need to get out my supplies and make some post cards.
ReplyDeleteDarla
your instructions are clear enough that i think i could actually do this craft, and i haven't dome much in the way of crafts in, oh, 10 years or so. thx! i love your result :)
ReplyDeleteI love the step by step of your process.
ReplyDeleteHappy Tuesday.
btw--did you ever get my email about your postcard? about wanting to share it on my blog?
Great tutorial, love the finished post card.
ReplyDeleteHappy T-day
I love this so much, so cute and fun!! Thanks so much for showing how you did it, these were clear and easy to see steps. It came out so good and perfect for T time in October today!
ReplyDeleteKeep these wonderful ideas/projects coming please!!
Great tutorial; thanks for sharing it. I love that you used so many household materials. Happy T Day!
ReplyDeleteThis collage has come out well. Thank you for sharing the step by step process.
ReplyDeleteI am so late! Nice tutorial. :)
ReplyDeleteHappy T-Day!