

How do you create a collage?
There is more than one way to
approach any art process...
but here I will share one of
the ways that I create collage
in my visual art journals.

1.) Apply watercolor to the page. Notice that for this particular background I did not blend the colors into one another, but left 'hard edges', (not blended) or even a little white space between colors.

2.) Collect/choose an assortment of papers and images that could be used in the collage. I usually use the background colors as a guideline. Above: ledger paper, graph paper, stamped cardstock, my drawings with watercolor on cardstock, vintage game piece images, fabric, scrapbook paper, and a random ticket. Not all of them will end up in the final collage. Part of the fun for me is sorting through what I have on hand.
The possibilities for use of ephemera are pretty much endless! From junk mail to vintage photos, the images you choose to use in your work will give the collage its own unique quality.

3.) Arrange your chosen collage elements on the background. This will take some trial and error. Move around the shapes and images, until satisfied with the arrangement.
Once I chose the bee image, that suggested the leaves and the flower. "Tea with honey" and the little tea cup drawing were chosen to go along with the T Tuesday theme over at The Altered Book Lover Blog.
Various printed papers, like the ledger and graph paper give additional texture and color to the composition. I also like lined yellow or white writing paper. I've included a scrap of tissue-box-cardboard (blue behind the flower) and my own painted and drawn doodles. The British stamp was chosen simply for color and shape. Color is usually the dominant factor that helps me choose the collage elements.

4.) Add lines in pen to the background. This helps unify the collage elements with the background. (At this point, other mediums could also be added: pencil, pastel, acrylic paints, etc. I chose to keep the number of layers to a minimum)
The overall flow of the shapes, spaces, lines and color should keep your eye moving over the surface of the collage. With collage, if something isn't quite working, you can remove it and replace it with something else, or just cover it up with paint or another piece of paper.
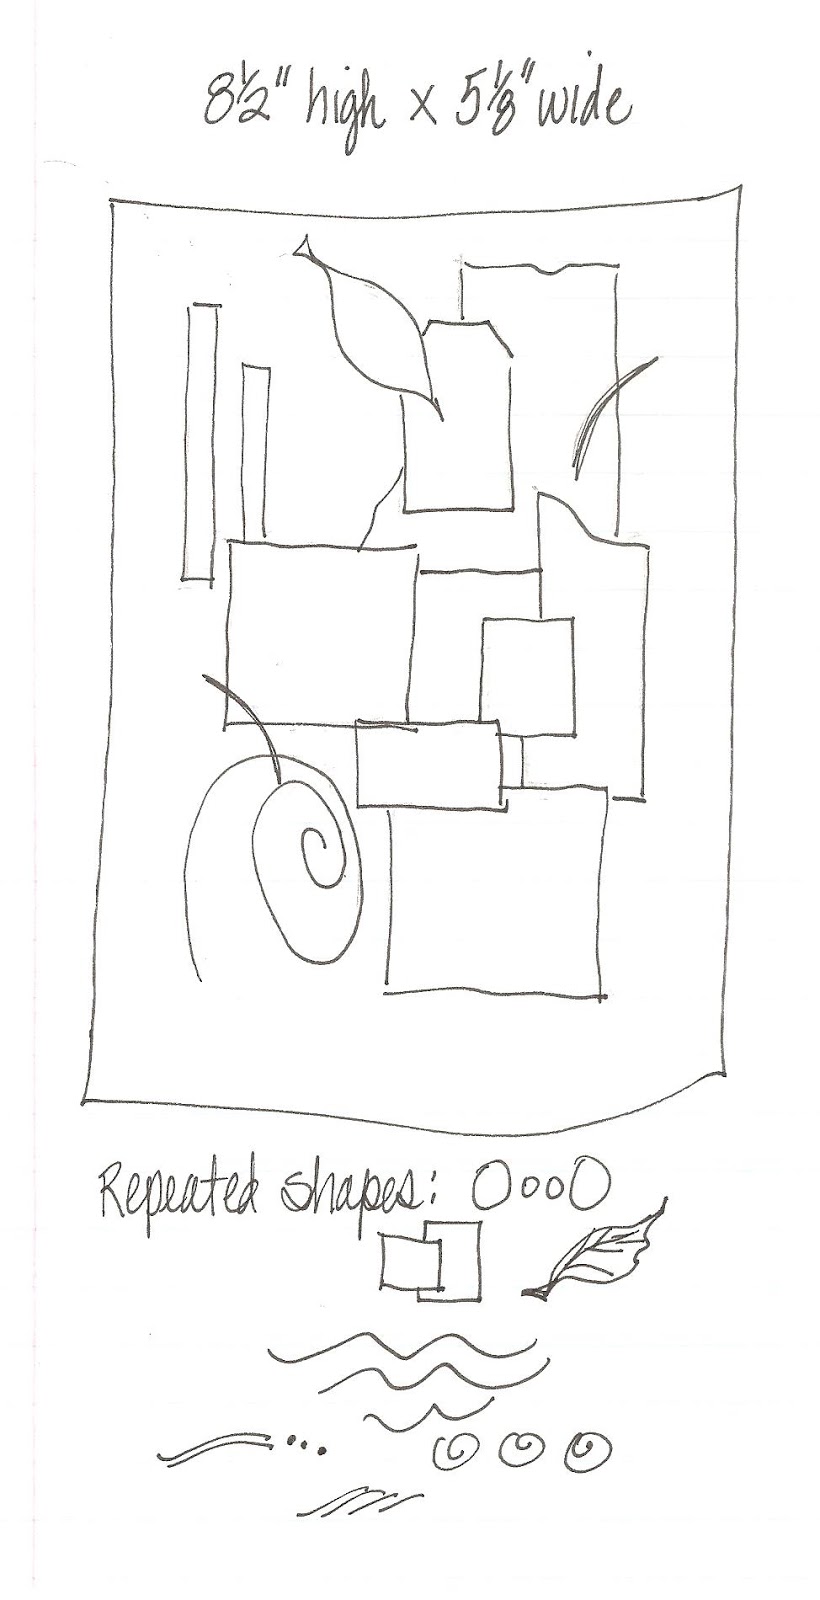
Here's a diagram of the shapes I've chosen and how the basic layout forms somewhat of an oval to guide your eye through the collage...

Since we read from left to right, our eye tends to also read the composition of an art work in the same way. I keep that in mind and try to make an 'easy entry' point in the upper left hand corner of the work. Of course, Eastern art and writing don't read from left to right, so it all depends on how you choose to work. As we often are reminded, there is no 'right' or 'wrong' in art.


Linking up with
Bleubeard and Elizabeth
for the T Tuesday link-up party.
All you have to do is include
a reference to a beverage to
join in. Tea is good, but I am
a coffee lover too! Share a photo,
poem, art work, recipe or anything
beverage related. Maybe even
a tutorial?!


Enjoy your tea with honey...
and enjoy some art
with collage.
You must have been reading my mind. I am planning to start another altered book I call "Scraps." I will certainly put this tutorial to good use as I prepare each page in the AB. Thanks for sharing it.
ReplyDeleteThis is a MARVELOUS collage and tutorial. I was super impressed, and like you, I am driven, first and foremost by color. It's probably my one strong suit. So I was really impressed with this. Thanks for sharing both your tea with honey and your tutorial with us for T this Tuesday.
I just put it all together and hope for the best. Yours looks lovely and I love the mapout that you did first
ReplyDeleteI so enjoy your collage art Dianne, so thank you for the wonderful tutorial!! I plan on working on drawing lessons while at the beach and I think this will work perfectly on a page or two. Happy T day!
ReplyDeleteOooh you had me with your bee.
ReplyDeleteReally lovely collage and interesting to read what all goes into your artwork Dianne.
I confess I don't think or plan much...stuff just comes together.
Thank you for sharing and Happy T Day! oxo
Thanks for the tutorial. It's helpful to me as I start trying to make ATCs to see how other people put things together. Happy T Tuesday!
ReplyDeleteThank you for sharing this tutorial. Collage is something I never feel I get just right. You explained and illustrated your process so clearly, that I think I will try again! Happy T Day!
ReplyDeleteYour collage is most beautiful. And as a scaredy cat when it comes to collage, I very much appreciate your description. Thank you for your comment on Wee Man's blog post. Happy T Day :D
ReplyDeleteps- the plates on the tea bus are some how fixed down, as is the tiered plate in the centre and the cakes and sandwiches never slid about. The bus did go fairly slowly, but fast enough to not be a hindrance in traffic :D :D
ReplyDeleteThank you for coming to TEA this week and leaving us a comment. The girls love it.
ReplyDeleteGreat tutorial (and journal page), and we all must be feeding off the same MOJO, cause I am going to try and teach the girls collage. I'll be bringing them back here to read you tutorial before we start. Love that you added a diagram. Yes, we are have a wonderful time making all kinds of art.
We go to the beach to get away from the dreadfully hot weather here at home, but we got fooled this year.....LOL....but it was still cooler by 20 or 30 degrees than here at home......girn
Well i enjoyed your tutorial almost as much as the artwork itself.. :) Lovely piece. Happy happy Tday even if i'am a little bit late.. Hugs! deb
ReplyDeleteLove the tutorial. The idea of the diagram is cool!Gorgeous post!Have a magical Sundat!
ReplyDeleteKarla
Your collage tutorial is fantastic. I esp love how you showed about the way our eye looks at art the same as reading. I never knew that. Thank so much! Happy T day...almost a week late. I skipped T last week. There just wasn't enough time. Glad I finally stopped by you post!!!!
ReplyDeleteWhat a fantastic tutorial! Great that you have now the tutorial button.. since I missed this last week.
ReplyDeleteThat inspires me very much.. I think I will give this a try.. and your advices are so professional! Great!
off to look the other tuts as well.