Tuesday, October 27, 2015

Autumn Journal Pages


I am influenced by the color
around me, including the
colors of the seasons.  This week
in Ohio, the light seemed golden, 
the autumn colors of the trees were
silhouetted against gorgeous blue
skies.  I spent quite a bit of time
walking at various parks this
week, enjoying the sunshine.

Above, a collage in my 
Documented Life Project journal.
The month of October challenge
was Translucent Papers.  The strip
of paper on the left of the spread is
Deli paper, painted with gouache.
 You may be able to see the 
yellow lined paper that is visible
beneath it.  The Jack-o-lantern and
moon are copies of watercolors
that I did, inspired by vintage images.


Next, I used painted tissue paper
on the pages above and below. The
 tissue was painted with watercolor,
let dry, and torn into leaf shapes.
Wet tissue paper is very delicate and
tears easily! Let dry after gluing, and 
draw outlines and details. (I used purple
gel pen) The oval leaves are from
 a vintage child's 'Shape Book.'


I think the above page is actually
my favorite.  The torn tissue paper shapes
were glued down for the leaves and the
shapes of the trees at the bottom. I also
used some highlighter, and fluorescent
gel pen, but not sure that detail is 
visible on the scan. (click to enlarge)


A 'Happy Halloween'
Artist Trading Card...
washi tape, markers, pen
and scrapbook paper.


Linking up with 
Bleubeard and Elizabeth for
T Tuesday, when I generally
have coffee instead of tea...
but no one seems to hold it
against me as we are all very
individual in our tastes!
Stop by Elizabeth's blog for
 a cup of something...


◘  ♦  ◘


Tuesday, October 20, 2015

Cross Stitch Halloween


Halloween cross-stitch designs from
The Prairie Schooler, Book No. 181.
I painted the grapevine wreath
 black and dusted it with black glitter.
I may never get all of the black glitter
swept up in the spare bedroom...
I swept, I used masking tape to collect
the bits that wouldn't sweep up. Now I
remember why I don't usually use glitter.
The kids will probably wonder if 
there are bed bugs next time they visit!
How's that for scary?!!
I did use paper underneath when I 
sprinkled the glitter, honest. It still 
went everywhere...


I heard that Prairie Schooler designs is
 closing up shop, and so I ordered
several of their patterns. They are easy
because they don't have half-stitches,
and are often in a square format.  I think
the 'angel-skull headstone' is my 
favorite on this wreath.


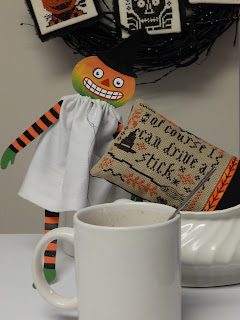
"Of course I can drive a (broom) stick"
was finished into a pincushion. Pretty
happy with the results...


The 'ghosty' version of
Pumpkin Jack is hangin' around nearby.


I stitched the wreath designs on 11 count cream
Aida fabric, so they were easy to see to stitch.
They are mounted on cardboard, with some
frayed black fabric as backing. The pattern
called for black felt for backing, but I used
what I had on hand.


Linking up with 
Bleubeard and Elizabeth's
T Tuesday party,
where you never know what
we will chat about...but there
is always a beverage involved.
Mine is mocha, because 
chocolate for breakfast is
cool.  Right?!


Tuesday, October 13, 2015

I Can Drive a Stick


Continuing to share Halloween
themed items this month...

"From ghoulies and ghosties and
long-leggity beasties and other things
that go bump in the night,
Good Lord deliver us."
I stitched this sampler from a printed
kit when I was a newlywed, so it's 
about 40 years old! It has been removed
from its frame with the intention of making 
a pillow from it, but somehow it hasn't
happened yet...


A few of my favorite things...
old books, paper crafts, doilies,
Halloween characters and fall color.


A card received from a past Halloween,
 thank-you dear Elizabeth!


Here is Pumpkin Jack...he doesn't sit
very gracefully...and there is a
'ghost version' lurking somewhere about.


One of this year's projects, above.
I designed this myself. It was fun to stitch,
 and just makes me smile.
Will post photos when I get the
project finished. It's going to be
a pin-keep, or small pillow.


Joining Bleubeard and Elizabeth
for tea or coffee, or whatever
shenanigans I can get into

Do you decorate for Fall
or Halloween?


Tuesday, October 6, 2015

Halloween Sketches and Tutorial


Sketches for Halloween
from vintage images.  These
are in my art journal from 2008,
pencil, pen, and colored pencil.
I plan to celebrate Halloween on
this blog for the whole month, so
stay tuned for Halloween fun,
both old and new!


Sketches for Art Dolls, also 2008.
The paper doll on the right
is the one I ended up making
from cardboard. You will get to
see 'Pumpkin Jack' later on in
the month of October...


Above, a sketch for an ATC
that I was planning. I don't remember
if the final card ended up looking exactly
like this, but I really liked the way this
sketch turned out. Look out Blues Brothers...


Above, is the art journal page
that I made for a TUTORIAL
this week. It's over on my 
weight-loss blog, Healthy Momentum.
You can also find it on the Tutorials Page
of this blog in the side bar. (look for the tea cup)
 The Tutorial was designed to be easy,
 for people who are just getting started in
journaling, or aren't confident in
their drawing skills. Try it!


Linking up with 
Bleubeard and Elizabeth for the
T Tuesday blog hop.  Above, a 
cute Rooster Tea Pot and matching
cups that I saw at Sauder Village.
Join us for a beverage and
creative pursuits.


Friday, October 2, 2015

Creativity Is...


"Creativity is Risk-Taking" ~  Sting

Many things can prompt a page
in your Art Journal.  If I see an interesting
 image or hear a snatch of phrase that 
gets my attention, I grab a bit of 
paper and write it down. The 'notes to
 self' get slipped between the pages of 
my art journal until I decide how to 
use them in my art. 

In this case, I was listening
 to a National Public Radio
broadcast about creativity. I hadn't
really thought about what creativity
actually IS, but these quotes
rang true for me.


To roughly paraphrase 
Elizabeth Gilbert, author:
We've often heard the phrase,
"follow your passion," but that puts
a pretty strong sense of intensity 
(and perhaps stress) on the individual. 
Curiosity is much more doable.
It gives us 'permission' to work our
 day job and follow our curiosity where
 it leads us without the pressure 
of having to become
a tragic figure or 'starving artist.'


Another place I've found art journal
fodder is on blogs.  Julie Fei-Fan Balzer
does pod casts with her mom and
 a guest artist. They are full of gems of
wisdom and laughter. 
"Creativity is about exploring possibilities"
is a remark from Julie.  When I listen
to a pod cast, I take notes!
  It's fun and informative, plus I can doodle!
Where have you found inspiration lately?


Linking up with Julie's
Stop by for some inspiration!


  •  ♦  •  


Tuesday, September 29, 2015

Morning Coffee and Collage


Starting my day with some coffee
and sketching is a winning combination.
Linking up with Bleubeard and Elizabeth


I thought I'd share this double page spread
with you, and try to arrange the scans
side by side in the post.  Either the limitations
of Blogger, or the limitations of the blogger (me!)
will not let me arrange them that way.
Some days things just don't work out the
way you had hoped.  And sometimes a 
bit of a 'shake up' is good for the
variety of life! 


The entire two pages will not fit onto

my scanner at once. Above you can see

how the pages fit together.  I am actually
rather pleased with the 'empty' space on
the left, (shown in the first image on the
 left) which allows the layers of papers
and colors to show through. It is so
 difficult for me not to fill up every
inch of space with images! Click on
any image for a closer look.


The days are getting cooler.
 I've been enjoying the gorgeous
blue skies and temperatures in the
70's and low 80's F. this week.
I remind myself to appreciate being
able to walk outside. It won't be long
before it will seem too cold. Perhaps
this will be the year I bundle up despite
the cold and walk outside in the winter.
Maybe. In the meantime, I love to 
see fall color emerging.  And I do
enjoy the Halloween season.
Stay tuned for some fun Halloween
projects and decorations next month!


   ♦


Tuesday, September 22, 2015

Tutorial: Art Journal Page


Last week I shared an art journal page. 
I had originally planned to post a tutorial
for making that page, but when I got the 
paintbrush in my hand and started 
creating, I completely forgot to take
 scans of the steps to complete the page!

I also realized that not everyone likes 
their own handwriting, or wants to take
the time to draw fancy letter styles.


So here's an Art Journal Page Tutorial
  with a variety of ways to add text, 
other than writing in your own handwriting...

"GOOD DAY" Art Journal Page Tutorial~
Supplies:
  • Art Journal of your choice; mixed media or watercolor paper is good, but not essential
  • Permanent (waterproof) marker or pen, in medium and fine point sizes
  • Watercolors and water
  • Paintbrush: 3/4" flat
  • Highlighters
  • Your choice of text - words/phrases
  • Scraps of a variety of papers: scrapbook, book text, painted scraps
  • Scissors and adhesive (I used Aleene's Tacky Glue)
  • Ideas for wording to be added to the page
•  •  •
My first step was to think about what
words or phrases would be included on 
the page, and determine the number of 
sections into which I would divide the page. 


I drew a border around the page: a
variety of wiggly lines, curlicues, 
marks and dots. I didn't try to be
necessarily balanced or 'even.'
I used a medium point permanent marker,
 over which I can use water media
 without smearing the ink.
I divided the page into the number
of phrases in 'my list' for a Good Day,
again making different little patterns
that are easy to draw. You could 
also just use 'straight' or wavy lines
as dividing borders.  Those who like
to Zentangle could really showcase
their abilities here!


I applied light watercolor washes to
the page,and chose to vary the colors
from section to section.  This is a Canson
sketchbook, so the pages aren't intended
for water media.  Some buckling of the 
paper occurred, but I just tried to use as
little water as I could. After it dried, just
closing the book flattened the pages again.
I used Prang pan watercolors--the kind
you can buy for elementary school kids,
and a 3/4" flat paintbrush to fill in
 the areas quickly.


For the lettering, there are a variety of 
ways to add text on the page:
  • --Your own hand-written cursive
  • --Your own hand-written printing
  • --Letters cut from magazines or newspapers
  • --Computer generated words or phrases
  • --Stamped text using rubber stamp letters
  • --Words cut from a book, or junk mail
  • --Lettering from scrapbook paper
  • --Letters from sticker sets or rub-ons
  • --Stencil lettering
  • --Use a typewriter to type words on a separate paper, then cut and paste the paper to your page
I didn't have any stencils small enough
 to fit on this page, but I did have some
 scrapbook letters that I cut out, and 
stickers--used in the last line.

This is a place where you could 
call your art journal page 'done.'
But I find that adding doodles, shading,
and decoration is my favorite part of
the process!


A view of the Bic highlighters I used,
and my morning cup of Mocha coffee.


I added highlighter (above) to some areas
to brighten up the page, add shading
and accents.  I also decided I needed
to clarify what I meant by
"accomplish something,"  so
 there is now another line in parenthesis
below it. Keep in mind that housework is 
the last thing on my daily 'To Do' list...ahem!

 This could be another 
point where you could call it 'done.'
but I want to create some
simple flowers for filling in some
spaces, so let's keep going...


I made some 'flowers' from
a book page. You could also use
ledger paper, scrapbook paper, or
any painted paper scraps.

Draw simple oval shapes with the
medium point permanent marker.
Then add color using watercolors,
or highlighters.  I used highlighters.


Be sure to draw your flowers in
a size that will fit your journal page.
Using highlighters, overlapping colors
can give you additional colors. I didn't
have a purple highlighter, but overlapping
pink and blue gave me purple. You can
add more details with a fine point
marker now, or later when you've 
adhered the flower to the page. 


Cut out the flower heads with scissors.
I cut several 'outside' the outlines, letting
the text create an additional border.
Adhere the flower heads to the page
where you like, draw in stems, and
accent stems with green highlighter.
At this point you could also draw leaves, 
but I drew leaves on the text page
scraps, cut out, and adhered
them also.


Beneath the top flower heads,
I didn't feel there was enough room
for leaves, so I drew in some 
curlicues and dots.

Another option for adding a decorative design is
to add some stamping. Since I am not confident
with my 'stamping abilities,'  I usually just draw
or doodle where I want to add designs.  It's your
Art Journal...do whatever you like best.

 For additional decorative motifs, research symbols in the assorted fonts of the word processing program on your computer. Look for symbols that might be fun to use on your journal pages. If you have any version of 'Wingdings' you can find a wide variety of symbols to use as 'fillers' or design elements. I printed out a page full of assorted motifs on white card stock, so I can have them on hand for future projects.


I chose a leaf design in Wingdings 2. (above)
 I made sure to include the reverse design 
in the motifs I printed out, so there would 
be a mirror image on opposite sides. I chose
to leave these uncolored, as I felt the black
and white went well with the striped scrapbook
paper on which I mounted these words cut
from an old book.


I rather wish I hadn't added the highlighter
to the word 'Art'...but it will do.


When I was looking for words to cut from
an old elementary school Health textbook,
one of the things it mentioned for the children
was being safe.  I rather take that for granted.
But I really shouldn't. Not everyone feels
safe...even in their own homes.  So
I decided it was a good reminder to 
include on this page.


Once I go to bed, I usually sleep fairly
well. But I am notorious for staying up 
late.  I've discovered, though, that 
many people don't feel as though they
get enough sleep. So again, I am fortunate.

Lastly, sign and date your page.
It's a helpful step in seeing 
your art work progress and change
over time.  Also, it's important
to have that signature to signify
your copyright of the work.


It's a good day when I finish
a blog post, and actually create
the tutorial that I had intended! 
Linking up for T Tuesday
with Bleubeard and Elizabeth.
Join us for a beverage...

What makes a "Good Day" for you?